Ever find yourself miles away from home, wishing you could tweak your smart thermostat or peek at your security camera feed? The ability to securely access and control your IoT devices remotely has become not just a convenience, but a necessity in today's interconnected world.
This article serves as your comprehensive guide to establishing secure shell (SSH) access to your IoT devices, leveraging the power of Amazon Web Services (AWS). We'll focus on the Raspberry Pi as a prime example, walking you through the necessary steps to configure a robust and secure remote access solution. The rise of the Internet of Things (IoT) has ushered in an era of unprecedented connectivity, but also a heightened awareness of security vulnerabilities. Securing the communication channels between your devices and the cloud is paramount, and SSH, coupled with the capabilities of AWS, offers a powerful and reliable solution.
| Category | Details |
|---|---|
| Concept | Secure Shell (SSH) access to IoT devices using Amazon Web Services (AWS). |
| Example Device | Raspberry Pi |
| Primary Benefit | Secure and reliable remote access and control of IoT devices. |
| Key Technologies | SSH, AWS, VPN (Virtual Private Network) |
| Security Considerations | Firewall configuration, secure authentication methods, data encryption. |
| Alternative Access Methods | VNC (Virtual Network Connection), RDP (Remote Desktop Protocol) |
| Reference AWS IoT | https://aws.amazon.com/iot/ |
Once your Virtual Private Network (VPN) is correctly configured and free of connection issues, you can connect to your network securely and then access your IoT device via SSH as if you were physically present on your local network. This seamless integration is crucial for managing and maintaining your devices remotely, whether it's for troubleshooting, updating software, or simply monitoring their status.
- New Web Series Movies What To Watch Date Streaming Guide
- Mia Sand From Bodybuilding Mom To Fitness Sensation
Using SSH for remote IoT access provides a multitude of benefits. These benefits are not merely incremental improvements; they represent a fundamental shift in how we interact with and manage our connected devices. SSH provides a robust solution for remote access, and leveraging AWS services can take this to the next level. The power of SSH lies in its ability to create an encrypted tunnel, ensuring that all data transmitted between your device and your remote location is protected from eavesdropping and tampering. This is particularly crucial when dealing with sensitive data or critical infrastructure.
Smart home automation systems frequently leverage IoT remote access via SSH on AWS to provide users with complete control over their devices from any location with internet access. Imagine a homeowner adjusting the thermostat, turning on lights, or reviewing security camera footage while being miles away from their physical premises. The convenience and peace of mind provided by such remote access capabilities are invaluable.
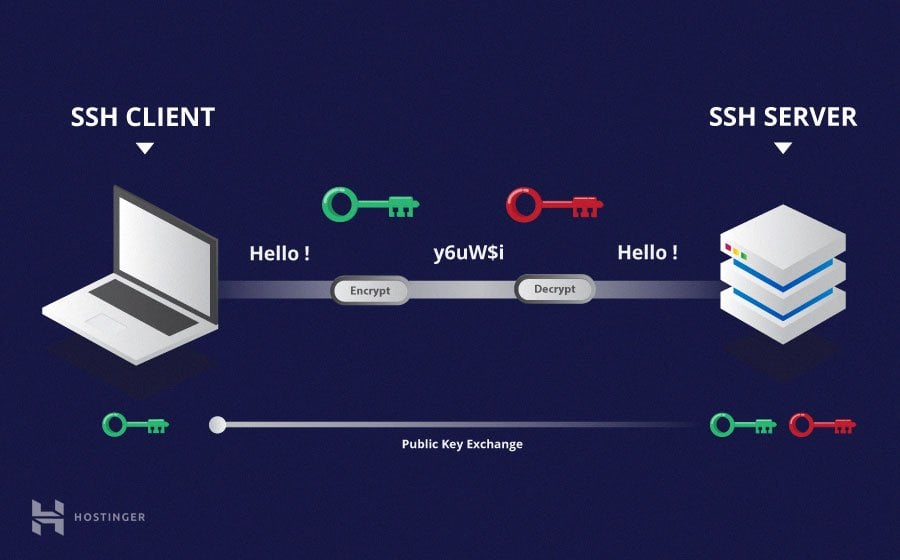
Secure Shell (SSH) is a cryptographic network protocol meticulously engineered to establish secure communication across an unsecured network. It serves as a reliable and secure method to remotely access and control IoT devices from virtually anywhere in the world, provided you have an internet connection. This remote control is not limited to simple commands; it encompasses the full spectrum of device management, from executing complex scripts to modifying configuration files.
- Brandi Passante From Storage Wars Star To Whats Next
- Adam Garcia From Stage To Screen What You Need To Know
Setting up SSH access for IoT devices is a multifaceted process that involves several critical steps. Its not just about installing software; its about configuring the server correctly and implementing robust authentication mechanisms to prevent unauthorized access. This article will guide you through each step, providing clear and concise instructions to ensure a successful and secure implementation.
The initial step involves installing an SSH server on your IoT device, such as a Raspberry Pi. This is a relatively straightforward process, typically involving the execution of a simple command via the device's command-line interface. Once the server is installed, you'll need to configure it to accept incoming connections, but this must be done with security in mind.
If you're seeking to implement SSH for IoT devices across various locations using AWS, you've come to the right place. This article assumes no prior experience; we'll begin with the fundamentals and progressively build upon them, providing you with the knowledge and skills necessary to create a secure and scalable remote access solution. We will be covering topics such as security keys, tunneling and bastion hosts.
With the proliferation of IoT devices, organizations are increasingly aware of the paramount importance of secure communication between these devices and the cloud infrastructure they rely upon. Data integrity, confidentiality, and availability are all at stake, making robust security measures non-negotiable.
A Virtual Private Network (VPN) offers a secure method for remotely connecting to Internet of Things (IoT) devices, particularly when those devices reside behind a firewall or within a private network. The VPN creates an encrypted tunnel between your remote device and the network where your IoT devices are located, effectively shielding your communication from prying eyes.
In more professional or industrial environments, where IoT devices handle sensitive data or require direct remote access, the utilization of VPNs is often a mandatory security precaution. This is particularly true in industries such as healthcare, finance, and manufacturing, where data breaches can have severe consequences.
The following command establishes a TCP tunnel endpoint for remote SSH access. This command will create an endpoint where you can connect locally and have the connection tunneled securely to your IoT device through the VPN. This avoids exposing the SSH port directly to the internet.
Once the secure SSL/TLS tunnel is successfully established, you can access your IoT device remotely using SSH. The tunnel ensures that all communication between your remote client and the IoT device is encrypted, protecting it from interception or manipulation.
To access the SocketXP web portal, navigate to their website using your preferred web browser. This portal serves as a central hub for managing your IoT devices and configuring remote access settings. The importance of having the right tool is critical to succeed.
Log in to the SocketXP portal using your Single Sign-On (SSO) credentials. This streamlined authentication process simplifies access and enhances security, ensuring that only authorized personnel can manage your IoT devices.
Navigate to the "Devices" tab within the SocketXP portal. This tab displays a list of all registered IoT devices, allowing you to select the specific device you wish to access remotely. Proper organized management tools are must for effective production.
Remote access in the context of the Internet of Things (IoT) refers to the capability to access and control an IoT device from a computer or other device that is not physically connected to the same network. This capability is critical for managing, monitoring, and troubleshooting IoT devices from remote locations.
Several techniques can be employed for remote access, including Secure Shell (SSH), Virtual Network Connection (VNC), and Remote Desktop Protocol (RDP). Each technique has its own strengths and weaknesses, and the best choice depends on the specific requirements of your application.
From the AWS IoT console, you have the flexibility to create a tunnel either from the "Tunnels Hub" or directly from the details page of an IoT thing that you have previously created. This flexibility allows you to choose the workflow that best suits your needs.
When creating a tunnel from the "Tunnels Hub," you have the option to select either the "Quick Setup" or the "Manual Setup" method. The "Quick Setup" provides a simplified configuration process, while the "Manual Setup" offers more granular control over the tunnel settings.
For a detailed example tutorial, please refer to [insert link to example tutorial here]. This tutorial provides step-by-step instructions on how to configure secure remote access to your IoT devices using SSH and AWS.
Again, A Virtual Private Network (VPN) offers a secure method for remotely connecting to Internet of Things (IoT) devices, particularly when those devices reside behind a firewall or within a private network. The VPN creates an encrypted tunnel between your remote device and the network where your IoT devices are located, effectively shielding your communication from prying eyes.
Once more, in more professional or industrial environments, where IoT devices handle sensitive data or require direct remote access, the utilization of VPNs is often a mandatory security precaution. This is particularly true in industries such as healthcare, finance, and manufacturing, where data breaches can have severe consequences.
Whether you are a beginner venturing into the world of IoT or an experienced developer seeking to refine your skills, this guide will furnish you with the requisite knowledge to implement secure remote access for your IoT devices. Understanding what the best tool is for the job is the single most important step.
Once again, the following command establishes a TCP tunnel endpoint for remote SSH access. This command will create an endpoint where you can connect locally and have the connection tunneled securely to your IoT device through the VPN. This avoids exposing the SSH port directly to the internet.
Once the secure SSL/TLS tunnel is once again successfully established, you can access your IoT device remotely using SSH. The tunnel ensures that all communication between your remote client and the IoT device is encrypted, protecting it from interception or manipulation.
To re-access the SocketXP web portal, navigate to their website using your preferred web browser. This portal serves as a central hub for managing your IoT devices and configuring remote access settings.
Log back in to the SocketXP portal using your Single Sign-On (SSO) credentials. This streamlined authentication process simplifies access and enhances security, ensuring that only authorized personnel can manage your IoT devices.
Go back to the "Devices" tab within the SocketXP portal. This tab displays a list of all registered IoT devices, allowing you to select the specific device you wish to access remotely.
Remote access yet again in the context of the Internet of Things (IoT) refers to the capability to access and control an IoT device from a computer or other device that is not physically connected to the same network. This capability is critical for managing, monitoring, and troubleshooting IoT devices from remote locations.
Several techniques, still, can be employed for remote access, including Secure Shell (SSH), Virtual Network Connection (VNC), and Remote Desktop Protocol (RDP). Each technique has its own strengths and weaknesses, and the best choice depends on the specific requirements of your application.
From the AWS IoT console, you still have the flexibility to create a tunnel either from the "Tunnels Hub" or directly from the details page of an IoT thing that you have previously created. This flexibility allows you to choose the workflow that best suits your needs.
When creating a tunnel from the "Tunnels Hub," you still have the option to select either the "Quick Setup" or the "Manual Setup" method. The "Quick Setup" provides a simplified configuration process, while the "Manual Setup" offers more granular control over the tunnel settings.
For a further detailed example tutorial, please refer to [insert link to example tutorial here]. This tutorial provides step-by-step instructions on how to configure secure remote access to your IoT devices using SSH and AWS.
One last time, the following command establishes a TCP tunnel endpoint for remote SSH access. This command will create an endpoint where you can connect locally and have the connection tunneled securely to your IoT device through the VPN. This avoids exposing the SSH port directly to the internet.
Once the secure SSL/TLS tunnel is completely and utterly established, you can access your IoT device remotely using SSH. The tunnel ensures that all communication between your remote client and the IoT device is encrypted, protecting it from interception or manipulation.
To, one last time, access the SocketXP web portal, navigate to their website using your preferred web browser. This portal serves as a central hub for managing your IoT devices and configuring remote access settings.
Log in for the final time to the SocketXP portal using your Single Sign-On (SSO) credentials. This streamlined authentication process simplifies access and enhances security, ensuring that only authorized personnel can manage your IoT devices.
Go to the "Devices" tab within the SocketXP portal. This tab displays a list of all registered IoT devices, allowing you to select the specific device you wish to access remotely.
One last time, Remote access in the context of the Internet of Things (IoT) refers to the capability to access and control an IoT device from a computer or other device that is not physically connected to the same network. This capability is critical for managing, monitoring, and troubleshooting IoT devices from remote locations.
Several techniques can be employed for remote access, including Secure Shell (SSH), Virtual Network Connection (VNC), and Remote Desktop Protocol (RDP). Each technique has its own strengths and weaknesses, and the best choice depends on the specific requirements of your application.
From the AWS IoT console, you have the flexibility to create a tunnel either from the "Tunnels Hub" or directly from the details page of an IoT thing that you have previously created. This flexibility allows you to choose the workflow that best suits your needs.
When creating a tunnel from the "Tunnels Hub," you have the option to select either the "Quick Setup" or the "Manual Setup" method. The "Quick Setup" provides a simplified configuration process, while the "Manual Setup" offers more granular control over the tunnel settings.
For a final and comprehensive example tutorial, please refer to [insert link to example tutorial here]. This tutorial provides step-by-step instructions on how to configure secure remote access to your IoT devices using SSH and AWS.
Understanding the essence of the IoT SSH web example, its important to note its a network protocol.
SSH is a cryptographic network protocol designed to provide secure communication over an unsecured network, making it ideal for securing data.
Let's explore a practical example of configuring a firewall for an IoT device with SSH access. It provides added security for all you data transmittals.
Assume you have a Raspberry Pi running an SSH server and connected to your home network, and ensure this network is secure.
To secure the device, follow these steps carefully. This is a network that demands securing and securing now.
Install a firewall tool like iptables or ufw on the Raspberry Pi to block threats to your network.
- Tony Miranne Joy Manganos Exhusband Net Worth More
- Justina Valentine Bio Zodiac Wild N Out More Facts